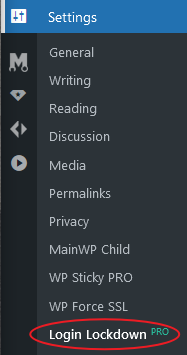
From your WordPress dashboard, where you have your plugin installed, navigate to settings and then navigate to Login Lockdown.
Once you navigate there, the plugin settings will open on the right side of your screen, with the first tab, “Login form protection,” opened.
You can enter three settings groups from here: Basic, Advanced, and Tools.

Basic settings
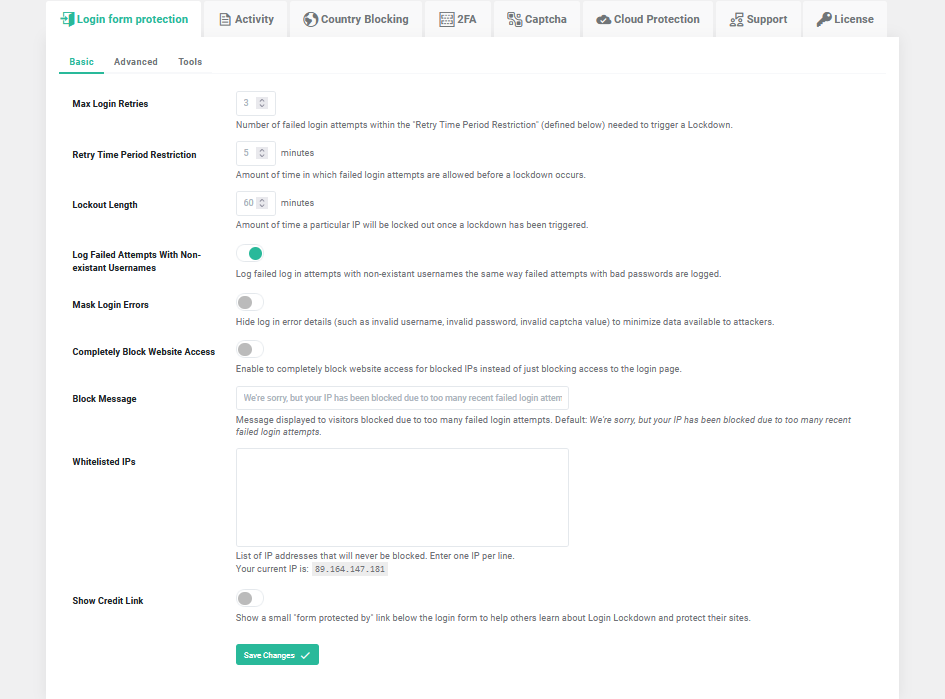
- Max Login Retries – enter the maximum number of failed login attempts within the “Retry Time Period” (also defined in this group of settings) that are needed to trigger a Lockdown. For example, if you set it to 5, everyone will be able to fail four times – if the person fails the 5th time, the login form will be automatically locked for this person.
- Retry Time Period Restriction – set an amount of time for failed login attempts before a lockdown occurs.
- Lockdown Lenght – set an amount of time in which some IP address will be locked out once the lockdown has been triggered (when the maximum number of failed login attempts was reached within the Retry Time Period Restriction time).
- Log Failed Attempts With Non-existent Usernames – disable or enable logging of failed login attempts with non-existent usernames the same way failed attempts with bad passwords are logged. For example, if your username is “admin“, but you try to log in with something like “admin“, you will automatically get locked out, and this action will be logged.
- Mask Login Errors – to minimize data availability to the attackers, you may also hide login error details. They won’t know if they entered a bad username, password, or captcha value. Enable this setting for better security measures. This setting can also improve security.
- Completely Block Website Access – this option enables blocking access for blocked IPs for the entire website, not just the login page. If you want blocked users off your website, you should enable this setting.
- Block Message – this option allows you to display your blocked users a message due to too many failed login attempts. You can enter your unique, personalized message. By default, the message states: “We’re sorry, but your IP has been blocked due to too many recent failed login attempts.“.
- Whitelisted IPs – in the textbox, you can list out the IP addresses that will never go blocked. They have to be entered in the format: one IP per line. Below the textbox, your current IP address will be written out so that you can always whitelist yourself.
- Show Credit Link – enable or disable a small “form protected by” link below the login form so that others can find out about this plugin and protect their websites.
Advanced settings
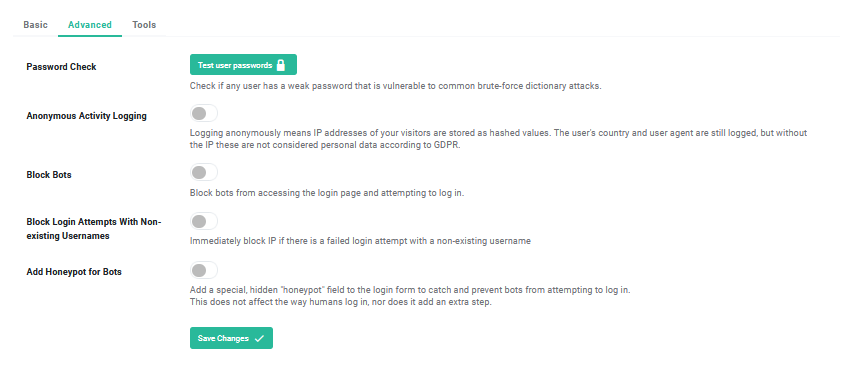 Moving to the second tab, we’re getting to the Advanced settings.
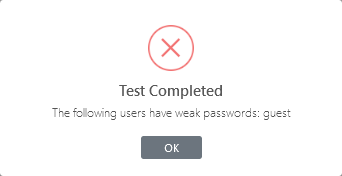
- Password check – it’s the test that can check if any of the registered users has a weak password that can be vulnerable to common attacks (by the brute force dictionary). The test process is simple. Just press the green “Test user passwords” button, and wait for the results. Once the test has been completed, the results will show the users with weak passwords, if any exist.
- Anonymous Activity Logging – you can enable or disable this option. Logging anonymously entails saving visitor IP addresses as hashed information. Although the user’s user agent and country are still recorded, GDPR does not consider them to be personal data without the IP address.
- Block Bots – as simple as it states, you can enable this option to block the bots from accessing your login page and blocking them from even trying to log in.
- Block Login Attempts With Non-existing Usernames – if enabled, this option will immediately block the IP address if the login was attempted with a username that does not exist.
- Add Honeypot for Bots – In order to detect and stop bots from trying to log in, this option adds a specific, hidden “honeypot” field to the login form if it is enabled. If a bot tries to fill out your form, it will fall into the trap and fill out this fake field, resulting in an immediate block. This doesn’t require an additional step or change in how people log in.
Tools
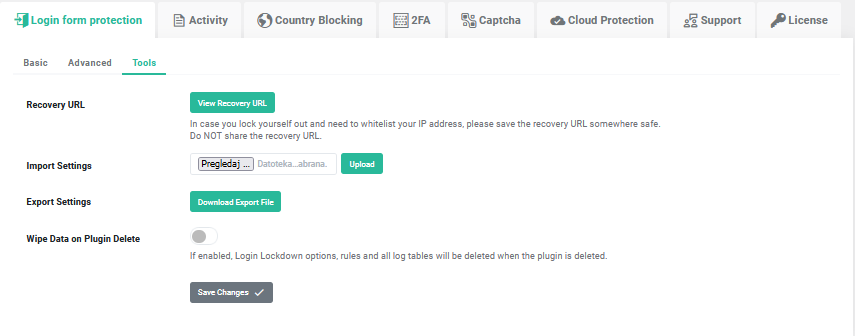 The third tab from the Login form protection setting is “Tools”.
- Recovery URL – here, you can see and save Recovery URL if, in any case, you lock yourself out of your site. The recovery URL should be kept somewhere safe yet reachable to you and can be used to whitelist your IP if you ever lock yourself out. This should not be shared with anyone.
- Import settings – allows you to upload your settings file directly to your plugin settings in WordPress.
- Export settings – allows you to export your settings and apply them to your other site simply and fast.
- Wipe Data on Plugin Delete – this option allows you to enable or disable removing all Login Lockdown options, rules, and log tables once the plugin is deleted. This can be useful for cleaning your site memory and database if you ever decide not to use the plugin anymore.